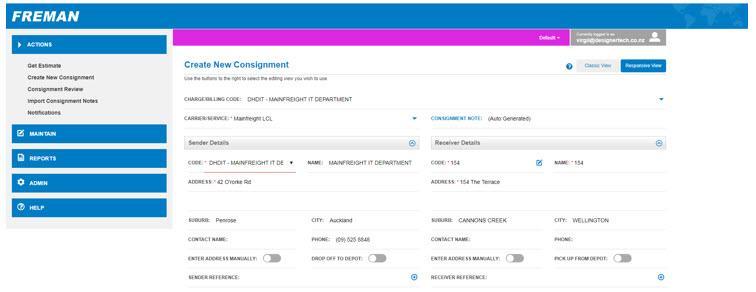
Create New Consignment
This page allows you to create consignment notes in Freman
Creating Note Templates with saved information allows for faster entering of consignment notes. Consignment Note Templates and information regarding DGs, Hire Equipment, Bookins etc. can be managed in the ‘Admin’ > ’Settings' menu.
Navigation
- Go to the ‘Action’ menu
- Click on ‘Create New Consignment’

Changing a Profile
- Multiple profiles can be created for your account with different default settings and default Note Templates
- Clicking on the drop down allows you to select the profile needed and will change the default Note Template based on what has been set up in the ‘Settings’ menu

Creating a New Consignment
- All fields with red underline and red * are compulsory and must be completed before you can save or print your consignment
- Some fields may already be filled in based on the default Note Template for your profile
- If you wish to change any settings please contact your Account Manager
Sender and Receiver Details
- A lot of the fields will auto-populate based on the profile Note Template found in the ‘Admin’ menu - however they can be changed if necessary
- Consignment Note Number
- Auto Generated – if you have been set up with Auto Generated consignment notes numbers you do not need to enter anything as the consignment number will be generated automatically
- Custom Consignment Number – if you have been set up with a Custom Consignment Number, enter the consignment number after the prefix (3 letters)
- Receiver Details
- As you begin to type the Receiver Code their details will show automatically
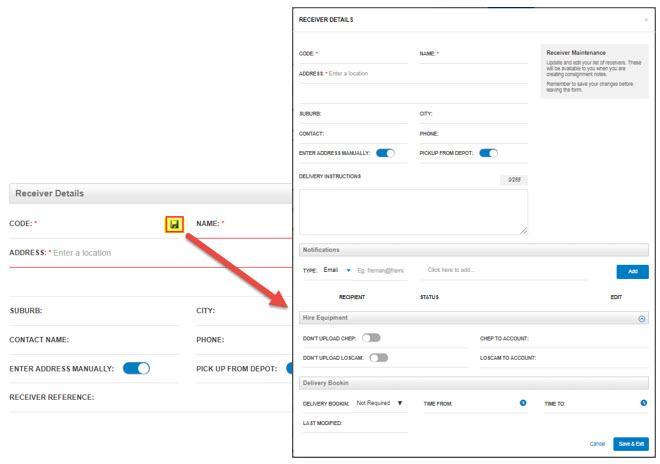
- If you are entering a new Receiver, complete the fields and then click on the Save button to save their details for use on future consignments
- These can then be managed in 'Maintain' > 'Receivers'

- Return/Non Standard Sender
- This is used for regular return consignments, any ad-hoc Senders or Freight Forward Pickups (where you are paying the freight but you are not the Sender of the goods)
- Addresses
- If the exact address is not found on Google Maps, you can select to enter the address manually
- Toggle the 'Enter Address Manually' button

Freight Details

- If you need more freight lines than what is showing, simply click on the 'Add New' button
- STC (Said To Contain)
- The STC field can be used to provide more information about the contents of the freight
- Eg, if you are sending a mixed pallet, STC can outline the quantities of what is contained in the mixed pallet
- STC M3 and KGs can be automatically displayed if enabled in ‘Admin’ > ‘Settings’
- STC M3 and KGS must equal the total M3 and KGS on the freight line
- Pack Type
- The type of freight being sent (eg. pallet, carton etc)
- Pack Types can be managed in ‘Admin’ > ‘Pack Types’
- Description
- For products that you send often, you can save the product descriptions and details in ‘Maintain’ > ‘Products’
- This can be useful for frequently moved Dangerous Goods products, as you can save specific details and confirm DG validation
- DG Class
- This will only be available if Dangerous Goods have been enabled in ‘Admin’ > ‘Settings’
- When a DG is entered against a consignment a DG diamond will appear to indicate whether the DG details have been validated;
- Green Diamond: Validated – all details are confirmed and saved and the DG Declaration Forms will be uploaded to us
- Red Diamond: Invalidated – details have not been confirmed or saved and the DG Declaration Forms will not automatically be uploaded to us. A pop-up box will appear so you can fill out the DG details. It will then become Validated.
- Customers using their own DG Declaration Forms do not need to enter anything in the pop-up box
- Volume and Weight
- If you entered the Height/Width/Length of the freight, the M3 will automatically calculate, however you can just enter the M3 without the dimensions
- Dimensions must be entered in metres, not centimetres - eg: 45cms would be entered as 0.45m
- Weight must be entered in kilograms, not tonnes - eg: 2 tonne would be entered as 2000kgs
Hire Equipment
- This will only be available if enabled in ‘Admin’ > ‘Settings’
- If the consignment contains hire equipment (eg: Chep or Loscam pallets) you will need to turn it on by toggling the 'Hire Equipment' button

- Select the appropriate 'Transfer Type':
- Not Transfer: when a consignment is being delivered on a hire pallet and then returned to Mainfreight with no transfer of hire equipment on Mainfreight's account
- Retrieval: when a consignment is being delivered on a hire pallet, the driver receives an empty hire pallet in return. Entering the account number allows you to be credited for the empty hire pallet.
- Transfer: when a consignment is being delivered on a hire pallet and there is no empty hire pallet returned. Entering your account number and the account number of the Receiving customer allows the hire pallet to be transferred and your account credited
Additional Pickup and Delivery Information
- If you have any further Pickup or Delivery instructions, please enter it here
- Cover Type: the type of insurance you would like applied to your consignment. The options are:
- Declared Value: the carrier is liable for any freight damage up to the amount you specify. A lightbox will appear with more information so you can confirm the Declared Value.
- Limited Carriers Risk: the carrier is liable for up to $2000 per item if lost or damaged
- Owners Risk: there is no compensation by the carrier if the freight is damaged or lost
- Bookin Timeslot
- This will only be available if enabled in ‘Admin’ > ‘Settings’
- If applicable, use the drop down arrow to select the Bookin status:
- Not Required: a Bookin is not required for this delivery
- Required: a phone call prior to delivery is required to organise a delivery time
- Confirmed: delivery details can be confirmed by filling in the 'Date' 'Time' and 'Reference' fields. This information will automatically be sent to us.
Notifications
- This allows you to set up email or SMS reminders (to yourself or others) at different stages of the freight movement
- You can save Notification details when editing a Receiver or in the ‘Maintain’ > ‘Receivers’ menu
- Select the Type of Notification you want to receive and click on 'Add' to save
Estimate
- Refer to the instructions shown under the 'Actions' > 'Get Estimate' menu for further information about receiving an estimate of freight costs
Print Consignment
- The default Printers and Labels are based on what has been set up in your printer settings
- To change the default settings, click on ‘Change Printer Settings’ or alternatively go to the ‘Admin’ > ‘Settings’ menu to edit

Save Buttons
- Reset
- This will not save the information you have entered, instead it will reset it
- Save & Exit
- This will save the consignment and leave the page
- You can view Saved consignments in the ‘Consignment Review’ screen
- Save & New
- This will save the consignment and keep the 'Create New Consignment' screen open so you can enter the next consignment note


